I loved playing with this paper pack. I liked the classy colors that work well for my daughter and use pink without being babyish. To celebrate, I created two layouts about her birthday using patterns from the Make it From Your Heart book.
This pattern made me nervous at first because of the five small photos, but my friend Kerrie inspired me to use it. I am happy with the way it turned out. Cropping the photos smaller can help draw attention to certain elements and hide my sometimes flawed photos. (Check back Friday for some suggestions about cropping photos in this way.)
 This paper seemed to call for bling and sparkle. I used the black sparkle flourishes some fussy cut flowers and Stardust Glitz.
  I used a sentiment stamp intended for cards for the title and subtitle on this layout. Because I was able to include so many small photos to tell the story, my journaling could be very brief. I tucked the thoughts into the right hand flourish.
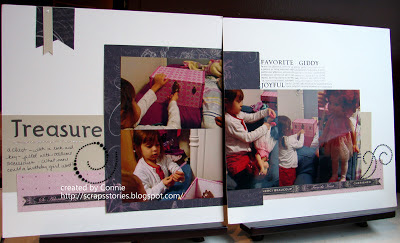
The second layout I created focuses on one gift my daughter received. This one also uses a pattern from the Make if From Your Heart book. I love using the patterns in this book because I can modify them to suit my layouts and style. Here I added two additional photos by using two 4X6 photos on the left page rather than a 5X7 and adding an additional photo cropped on the right page.
 I used the same black sparkle flourishes (one pack was enough to create both layouts) and Startdust Glitz to embellish this layout. Once I find supplies that work well together I love to create multiple layouts using the same set. It saves me time making decisions!
 For this layout I also used some word and definition stamps as embellishments. A variation on the rock and roll technique let me stamp the words in black and the definitions in grey so that the embellishment didn't overpower the layout.
Thanks for stopping by! Remember to check Friday for some suggestions on cropping photos.
Your next stop is Karen's blog. I'm sure you'll love what she created.


