Pages

Showing posts with label Interactive page. Show all posts

Thursday, May 1, 2014

Timberline on the Paper Trail

Welcome to the Paper Trail Blog Hop! You're on the right track if you've arrived here from Linda's blog. If this is your first stop, I hope you'll continue on through our circular trail to see all of the creations.

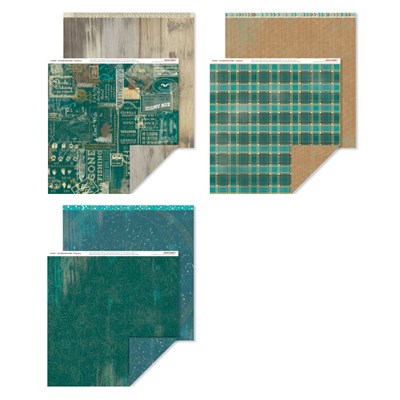
This month we are hopping along with the Timberline paper packet. I love the rich colors of this paper, and the theme made it perfect for capturing memories of a summer hike!


I started with the Workshop on the Go. I love these kits because they make creating layout so easy since they include papers, patterns, stamps and embellishments that coordinate! The workshop layout wasn't a perfect fit for my photos, so I decided to take advantage of the flexibility of the kit and use the supplies to create my own layout!


I used the Hat Trick pattern from the Magic pattern book to emphasize my photos and two of the fun outdoor-themed patters in the paper pack. I personalized the layout to our specific adventure by stamping hiking boots - from the workshop exclusive stamp set - across the page in two different places.


The wooden signs from the Timberline assortment further added to my hiking theme. and I rounded out the embellishments with some brown buttons and fibers - even a bit of sewing!


I had many landscape photos from our day hike and struggled to choose which ones to include on my layout. In order to allow room for one more, I used the button slide technique also from the Magic book. Here is my interactive element in action:


Although I have created interactive elements before, I had never followed any of the technique directions in Magic. It was surprisingly easy, and I love the way it turned out. The technique directions even include steps to modify the page protector so that my interactive element can be protected in an album! I will definitely be trying more of these techniques in the future!

Thanks so much for stopping here on the hop! I hope you'll check back next week for more fun layouts. Until then, head over to Diane's blog. I'm sure you'll love what she has in store for you!


Friday, January 3, 2014

Designing a Four-Page Layout

Earlier this week I shared a four-page layout I created using a the Sarita paper pack and a True Fit Folio. Today, I want to share some of my thoughts about designing in this four-page format. When I design a layout with a folio, I turn the pages lots. I consider how the page will look with the folio open and with it closed. I think about my canvas as a two page layout (closed) and a three page layout (open).

As I turn the pages, I make similar design choices to those I would with any multiple page layout. I try to use similar organization - in this case photos grouped mostly in the center of the page with cardstock and pattern paper covering much of the base page. I try to include the same papers on each page of the layout - although in different proportions to keep it interesting. On each page in this layout I used two different pattern papers - the Outdoor Denim and Lagoon pattern and the multicolored textured pattern. I also used two colors of cardstock - Outdoor Denim and Gypsy.  I try to include the same types of embellishments on each page of the layout - although I vary the size and placement. On this layout I used mostly stamped embellishments and Lagoon washi tape. In short, I try to use similar elements to create unity over all four pages.

The left page - always visible.
I included the title here so that it would be a part of the layout open or closed. I used a photo that encapsulated the theme of the layout and one photo of each of my kids. This page gives the main idea of the layout.

Elements that will repeat:
Title and many accents stamped in Gypsy ink
Small starbursts in Goldrush ink
Washi tape stamped on Gypsy cardstock.

Notice all four papers on top of the base page.


Right page - visible when closed.

I used a couple of my favorite photos here since this page will be visible on first viewing the layout.

Repeating elements:
Word accents stamped in Gypsy ink
Stamped image in Goldrush ink near the bottom
Washi tape stamped on Gypsy cardstock.

Inside page top - visible above and to the right when Folio open.

The photos here focus on one event - the first gift of the season. The journaling on this page tells that story as well.

Repeating elements:
Word accents stamped in Gypsy ink
Washi tape stamped on Gypsy cardstock
Notice, there is no Goldrush stamping here except for the washi. This page just got too full. Although I set out to include these elements on each page of this layout, this exclusion doesn't bother me because there are so many other repeating elements.


Inside page bottom - visible next to left page when Folio open.

The photos here cover a range of events from the season. This collection of photos may seem random on its own, but combined with the other three pages, it works to tell the story.

Repeating elements:
Word accents stamped in Gypsy ink
Washi tape stamped on Gypsy cardstock

Notice, I broke my stamping pattern again using Outdoor Denim for the ornament accents. This was purely a practical choice. It was the only color that would show up on the dark pattern paper!


The Folio and coordinating products allowed me to create one unified layout that tells the story of our entire Advent season using 12 photos.

How do you record seasonal memories? What about events with many photos? 

Wednesday, January 1, 2014

Paper Trail Blog Hop with Sarita

Happy New Year and welcome to the Paper Trail Blog Hop! This month we are hopping along with Sarita. You may have arrived here from Betsy's blog, but if not, don't worry our hop is circular. Toady, I have one layout made up of four pages to share. One layout made up of four pages? How? I used a True Fit Folio - a 12X12 folder - to create an interactive page. 

Here is the main part of my layout - what you would see when you turned the page in the album.


And here are the other two pages hidden behind the right hand page above. 


I love the number of photos I can include in one layout with a True Fit Folio. The colors of Sarita reminded me of Advent - we use purple, blue and pink in our church. With the True Fit Folio and Sarita papers, I was able to capture many moments from our Advent season.

And here are some details. The title using the retired Cocktail alphabet.

I stamped in colors that coordinated with the paper pack - Gypsy, Goldrush, Outdoor Denim, Lagoon and Cotton Candy. In addition to the Lagoon washi tape, I used the hostess rewards stamp set Washi Wonder to embellish this layout.


The only embellishments I used on this layout were stamps. I feld that there was enough going on with the patterns of the paper, number of photos and variety of washi tapes.


Since my layout focused on the Advent season, I used some holiday stamps as accents.


Thank you so much for stopping by! If you would like to read more about creating with True Fit Folios, stop back on Friday. I'll be sharing some of my thought process when creating this four page layout. Until then, I hope you'll continue on to Lynn's blog; I'm sure you'll love what she has created.

Tuesday, October 1, 2013

Babycakes and a Dragon

Welcome! If you've arrived here from Linda's blog, you're on the right track. If this is your first stop, welcome to the Paper Trail blog hop! This month we are featuring the Babycakes paper packet. Don't let the name fool you, though. This paper packet is fun and versatile!

The alphabet paper inspired me to create this layout featuring my daughter and a story she wrote:


In addition to Babycakes, this layout features a Flip Flap from the large assortment to protect my daughter's original story. This way, you can read the story in its entirety.

The page beneath the Flip Flap gave me a spot to record my thoughts on her writing, without competing with it for space on the page.

I stamped my title directly on the polka dot pattern paper. I like the way the Chocolate Ink looks on this paper, but if you want a darker shade using dye ink you can always double stamp - stamp your image once then re-ink the stamp and stamp again in the same spot. This technique gives a bolder version of the same color.

The heart stamp (as well as the stamp near the top of the journaling) is from the Workshop on the Go kit. I love that each workshop includes an exclusive stamp set because stamps are reusable! Often the stamp sets are what inspire me to purchase the workshop kits.

This kit also included the bronze shimmer trip I used to embellish. I have to confess, this was the first time I used the shimmer trim. I was impressed! What a fun and easy way to add a bit of sparkle to a project!
The shimmer trim also inspired me to pull out these retired (read "been in my stash for years") glittery brads. I thought they did a nice job of tying together the sparkle and the circles.
Thanks so much for stopping by. I hope you'll be back on the weekend to check out some more projects. Until then, hop on over to Amy's blog. I know you'll be impressed with her "baby"!

Tuesday, September 3, 2013

Try it on


One of my favorite parts of scrapbooking is creating with people. I love seeing what other people are working on - what colors they are using, what designs, what embellishments and how it all comes together. I also love getting inspiration from the projects other people are working on. I've been creating a lot this summer, but much of it has been on my own. When I hosted a layout class a few weeks ago, in addition to showing the techniques I was planning to teach,  I was totally inspired by the pages the other ladies created. After they had gone, I gathered the extra supplies and created this layout:


I started by arranging the circles in a rough vertical line near the left hand side of the page. I worked only with the circles that were already cut and played around with them until I was happy with the arrangement. (I did count so that I included three of each type of circle.)


I struggled with the design beyond the vertical line of circles. I had three photos I wanted to include as well as the journaling to tell the story. I couldn't make all of those pieces fit in a way that made me happy. There just wasn't enough space on the page - so I added a flip flap. The extra space gave me enough room for the third photo and the journaling.


I finished the layout with some stamping and some sparkles.

Thanks for the inspiration, ladies! This one will win approval even from my fashion conscious little one!