Pages

Showing posts with label Two-page layouts. Show all posts

Thursday, September 11, 2014

Ohlala - Christmas Eve Dinner with Yuletide Carol

Sometimes the best way to use a stamp is to cut it! On this two page layout I stamped and cut both the title and part of the cluster of embellishments.


All of the stamps are from the Yuletide Carol Workshop on the Go.

The title stamp is a simple tag shape that was easy to cut around.  I loved the shape, but I wanted to use my own title so I did some fancy stamping. Check back later this week for instructions!


The embellishment tickets are from the same stamp set. These ticket shapes coordinate with a shape on our Artbooking Cricut Collection so you could cut the images with the Cricut or by hand.


What tools do you use to cut your stamped images? What would you like to try that you haven't?
Remember, every comment this month will be entered into a drawing for a free stamp set!


Friday, August 8, 2014

Another Wanderful Layout - A Workshop on the Go!

As you can imagine, the story of our flight was only the first of many from that trip. For this layout about an evening visit to Epcot, I decided to emphasize the world travel theme. The 
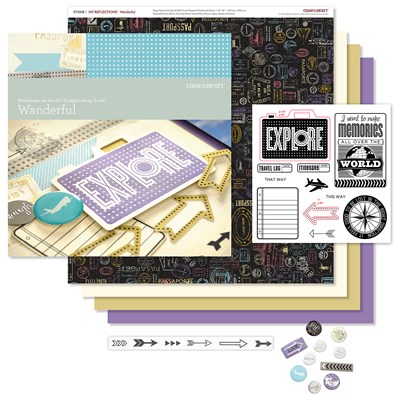
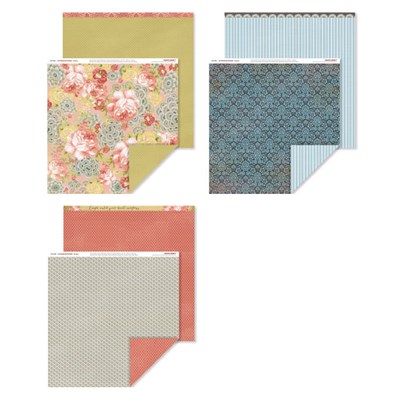
Wanderful Workshop on the Go was perfect!


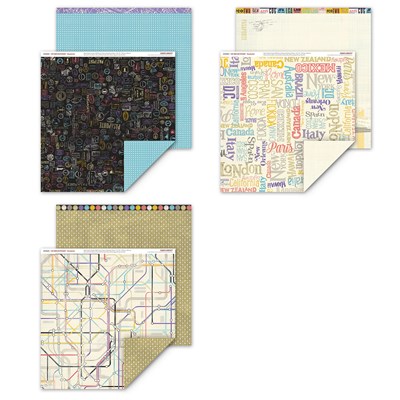
Here are all of the items included in the workshop kit:
 
I love workshops on the go for many reasons. Here are the top four.
#1 The design is done for me!
I love the way the title, photos and journaling work together to tell the story on this layout. I modified the photo placement from the layout described in the brochure because I had different photos, butthe design still works! The paper elements on the layout laid a good foundation that made it easy for me to add my photos.


#2 Each workshop comes with a kit exclusive stamp set that coordinates perfectly with the papers!
I love the airplane, the journaling card that looks like notebook paper, the arrow, the title! All of these images were designed to coordinate with this paper and it works! Did I mention that this stamp also coordinates with the Artbooking Cricut cartridge? And the workshop kit is the only place to purchase this cool stamp!


#3 Each kit comes with more than one coordinating embellishment!
This kit included the Wanderful Assortment set of flair and the arrow washi tape which is quickly becoming my favorite. As with the stamp set, these products were designed to coordinate with the papers so they are easy to use and really help to tell the story!


#4 The workshop kit is a great value!
 Perhaps this should have been number one. Each workshop kit is a great value. You receive the paper pack, the exclusive stamps set, two coordinating embellishments and the brochure with measurements, full color artwork and additional ideas. Even after creating this layout, I have lots of paper left, about half of the flair and most of the roll of washi tape. Oh, and don't forget about the stamp that I will be able to use for as many projects as I like! I am sure you will see these products again!


This workshop on the go made it easy for me to tell my story of an evening at Epcot. I didin't have to agonize over pattern books or sketches to choose a design. I didn't have to dig through my stash to find stamps or elements that coordinated. All that I needed was to select my photos and tell my story! That is my kind of a layout!

What is your favorite workshop on the go in this idea book? If you don't know, why not check out the Annual Inspirations Idea Book online to see which one might help you tell your story! Don't forget to come back here and tell me which is your favorite! One lucky responder will win a prize!

Wednesday, August 6, 2014

Explore - Featuring new paper Wanderful

Each month I feature a particular paper pack for my layout club. This month, we are playing with Wanderful.This cheery travel-themed paper pack includes the new color Flaxen as well as Gypsy, Crystal Blue and Honey. Since blue and purple are two perennial favorites in my house, this paper is a sure favorite!


The travel theme of this paper inspired me to dig out photos from a trip two years ago. I used a pattern from Make it From Your Heart Volume 2 to create this layout about the plane trip.


We had a very early flight. I snapped these photos before the plane even took off. I love the contrast of the looks on my two kiddos faces.


The left side of this layout was perfect to feature these three photos. One of the things I love about using CTMH pattern books is that it is easy to adapt the layouts to my photos no matter what the size!


I didn't have any other photos of our flight or the preparations, but I had tickets! Using memorabilia helps to tell the story on my page. I don't have to include our destination or the specific time of the flight because it is on the tickets!
*Tip: One way to keep your photos safe when using memorabilia is to include them on two separate pages of the same layout.


The fun camera title is a stamp from the Wanderful Workshop on the Go combined with a Cricut cut from the Artbooking Cartridge. One of my favorite things about the Workshops on the Go kits is the exclusive stamp set. Even after the workshop is completed, I can use them again and again!
Do you see that Crystal Blue paper with the arrows? Background paper I created with another stamp from the Workshop set!

Check out this great new paper pack on my website. If you'd like to make this layout yourself, join us for layout club!

Tuesday, July 1, 2014

July Paper Trail - Balloon Ride

Welcome to the paper trail!  This month we are hopping along with the Balloon Ride paper pack. You may have arrived here from Diane's blog or this may be your first stop. Either way, I hope you travel our circular path to see some lovely creations with this paper pack.

Although I've never been in a hot air balloon, I was immediately drawn to the soft colors of this paper pack. Something I appreciate about Close to My Heart paper packs is that themed packs also include papers that coordinate but don't extend the theme. For me this means if I like the colors, I can use the pack no matter what the theme. This month it meant that I could use thus vintage travel themed pack to tell stories about my kids in our own yard.

 My layout this month plays on the blues and pinks in the paper.


It seems I often end up with three photos of an event and then I debate: one page or two? For this layout - design inspired by Cathy Zielske - I spaced the three photos over two pages. This let me showcase the paper and still focus attention on the photos. I also like that this design gives the story the same presence as the photos.


I punched circles from other papers in the pack to accent the layout and included a bit of Metallic Baker's Twine for sparkle.

I had some circles leftover when my layout was finished so I decided to make a coordinating card. (This is one of my favorite quick and easy, supply saving techniques.) Here is the card I came up with:


I love the variety in this paper pack. The pinks and browns look so different without the blue. Come back Thursday to see another layout that focuses on the browns! In the mean time, I hope you'll hop on along to Linda's blog to see what she created. 

Happy crafting!

Thursday, May 1, 2014

Timberline on the Paper Trail

Welcome to the Paper Trail Blog Hop! You're on the right track if you've arrived here from Linda's blog. If this is your first stop, I hope you'll continue on through our circular trail to see all of the creations.

This month we are hopping along with the Timberline paper packet. I love the rich colors of this paper, and the theme made it perfect for capturing memories of a summer hike!


I started with the Workshop on the Go. I love these kits because they make creating layout so easy since they include papers, patterns, stamps and embellishments that coordinate! The workshop layout wasn't a perfect fit for my photos, so I decided to take advantage of the flexibility of the kit and use the supplies to create my own layout!


I used the Hat Trick pattern from the Magic pattern book to emphasize my photos and two of the fun outdoor-themed patters in the paper pack. I personalized the layout to our specific adventure by stamping hiking boots - from the workshop exclusive stamp set - across the page in two different places.


The wooden signs from the Timberline assortment further added to my hiking theme. and I rounded out the embellishments with some brown buttons and fibers - even a bit of sewing!


I had many landscape photos from our day hike and struggled to choose which ones to include on my layout. In order to allow room for one more, I used the button slide technique also from the Magic book. Here is my interactive element in action:


Although I have created interactive elements before, I had never followed any of the technique directions in Magic. It was surprisingly easy, and I love the way it turned out. The technique directions even include steps to modify the page protector so that my interactive element can be protected in an album! I will definitely be trying more of these techniques in the future!

Thanks so much for stopping here on the hop! I hope you'll check back next week for more fun layouts. Until then, head over to Diane's blog. I'm sure you'll love what she has in store for you!


Tuesday, April 1, 2014

Ariana on the Paper Trail!

Welcome to this stop on the Paper Trail Blog Hop! You've likely arrived here from Inky Fingers, Karen's blog.  If not, never fear. As always, our hop is circular so you can start anywhere! 

I love the Ariana paper pack! The patterns are elegant and include my favorite color ever: Outdoor Denim. True confession, Outdoor Denim is one of the few ink pads I have worn out past the point of re-inking. I

This elegant floral paper was perfect to record an elegant birthday celebration. Ariana features kit exclusive colors Ariana Coral, Ariana Green and Ariana Grey. I didn't have enough Ariana Coral for my design, so I went into my stash to see what I could find. I came up with Blush cardstock which worked well for my project. Here is how my two page layout turned out.

The left page:


The right page:
 

I used the stamp set from the Ariana Workshop on the Go to create these flower embellishments using the rock and roll technique. Since I had used Blush cardstock, I used that as a base for my stamping and rock and rolled with Hollyhock.    

Workshops on the Go are a good bargain and they come with products that already coordinate perfectly including an exclusive stamp set!    


I also used a new favorite stamp - Banner Wishes - to create the title for my page.  A few sparkles including one small flourish add some elegant details.


I decorated the edge of the Outdoor Denim cardstock using the Scallop Border Punch. The border is a strip of Blush cardstock embellished with another sentiment from Banner Wishes.


Thanks for stopping by! I hope elegant Ariana has inspired you. Please leave me a comment and let me know what you think before you continue on the Paper Trail to Mary's blog, The Road to Peace of Mind or Escape?

Saturday, February 1, 2014

A Lovely Easter on Ivy Lane with the Paper Trail

Welcome to the first Paper Trail blog hop of the new Spring/Summer Idea Book!  Whether you're arriving here from Amy's blog or this is your first stop, I know you're going to enjoy the elegant look and lovely colors of the Ivy Lane papers!

The combination of colors: Blush, Hollyhock, Ivy Lane Green and Ivy Lane purple, together with
the flower motifs reminded me of spring, so I turned to Easter photos. I used pattern from Make it Your Heart Vol. 2. I love starting with a pattern like this one - and then changing it to fit my layout.

Here's a closer look at the left page. I love the way the yellow of the chick pops against the colors of the paper.  The pattern included three photos on the strip, but I only had two. I cut the pieces the same size and then used the remaining space for my title.


Tip: Use patterns as a starting point, then change them to fit with the photos and products you want to use!

And, here is the right page. 

I used fancy embellishments to emphasize the elegant paper even though my photos were a bit more playful. In each embellishment cluster, I included a Cricut cut rosette, a butterfly and pearls.


I created the title using Cricut Artbooking cartridge and one of the coordinating stamp sets - Sweet and Lovely.

Thanks so much for stopping by! Come on back later this week to see more projects made with new products! For now, hop on over to Karen's blog. I'm sure you'll like what you see!

Friday, January 10, 2014

Sneak Peak!

Check out a couple of photos of the layout for next Thursday's club night! We'll be creating a double page layout using the Babycakes papers, the January stamp of the month and some dimensional elements!


Are you interested in creating this layout? Why not join us at layout club next Thursday?

Sunday, December 29, 2013

A little Sparkle and Shine

Sparkle and Shine - I love this paper pack! I'm sad it's only available through the end of this month (12/31 that is!) I am not ready to say goodbye to Christmas yet, and I have more Christmas photos to scrapbook. I may have to order another pack in the next two days.
This is the layout my club created in December.


Did you notice the fun ornaments on the page? I used the Trim the Tree stamp set and also the Sparkle Holiday Shapes  also from the holiday gift guide. I love the way the Cricut cut ornaments get added pop from the sparkle.


Remember, all of the products from the holiday gift guide are only available through December 31. Shop my site or contact me to get your own before then!


Sunday, September 1, 2013

Life is Sweet on the Paper Trail with Huntington

Thanks so much for stopping by! This month on the paper trail we are hopping along with Huntington. If you've arrived here from Mary's blog you are on the right trail, but don't worry, this is a circular hop so just start here!

I love the vibrant fall colors in this paper packet. I especially loved the exclusive stamp set featured with the workshop on the go
I stayed very close to the pattern found in the workshop guide only changing the size of the photos and the journaling block.


I loved the way the colors featured my fall hike photos without overshadowing them and the stamped title worked well!


The added dimension of the foam adhesive and multiple color stamping worked well with the stamps that already give the appearance of dimension.


Here is the left page:


And here is the right:


I love that the Huntington Assortment features both wooden spool tops and canvas shapes. It is so easy to add texture with each of these items. It was also lots of fun to combine them. The sprinkling of stamped leaves and sparkles were great finishing touches.


Life is sweet with workshops on the go! It was easy to combine the elements of the kit to create this fun layout. The best part is that I still have more paper and embellishments - and of course the stamp set. I will certainly be making more fall layouts with this kit! In the meantime, please continue on to Linda's blog to see what she created. I'm sure you'll fall for her project, too!