Pages

Wednesday, January 16, 2013

36 Projects

My friend Karen asked recently how I was doing with my goal of 36 projects in my 36th year. I had to admit that I am not doing so well. I even contemplated just quitting and chalking it up to a good idea that doesn't really work for me. That is a bit difficult to do, however, because I shared the goal here. I have decided that I will continue on. I am not convinced I will complete all 36 before my birthday, but I will keep working toward that goal none-the-less.

Here is my original list of projects with some updates:
Here are the projects I've completed that weren't on my original list:
I've posted 9 projects so far. I think I have three or four others already completed but not yet posted. I also have some good ideas I haven't tried yet. Who knows, maybe this check in will be just the motivation I need to get all the way to 36!

My main goal is to be creative outside of scrapbook pages. I would love your ideas for other projects! Do you have any suggestions for fun, useful projects?

Monday, January 14, 2013

First Layout of 2013

Here it is! My first layout completed this year.

My school photo from this year seemed to fit with this paper pack - the long retired Grace from CTMH. The papers and Stickease were perfect, and it was easy to use so many coordinating products.


I've been making layouts like this one for a few years now, but it still surprises me how cathartic the process can be. While creating this one I:
  • reviewed some of what I accomplished last year 
  • got my hands into paper (and cutters and tape runners) for no purpose other than my own pleasure
  • used papers and embellishments that I have loved literally for years but have been saving for some "perfect" project
  • admitted some things about the way I follow through on goals
  • forgave myself for the same things I had just admitted
  • remembered that I have to complete this layout before I feel ready to complete one about goals for 2013
  • recorded most of that so that hopefully I will remember to do it again next year!
For me it was surely time well spent.

I started the layout with the layered base papers and photo. Then I went to the Stickease for help with a title. I loved the look of this frame, but the words inside didn't fit. I had planned my layout around the "in review" theme so I knew I wanted that title. I added the letter stickers over the majority of the title on the frame, but I didn't have enough space for my whole two-word title. To cover the remaining portions of the frame I cut into the patterned backing paper between the Stickease stickers. The background pattern is the same as that of the letters, so once I found sections that were big enough to cover the underlying text, I simply cut them into the appropriate shapes and then added them to the frame and wrote in my text! Notice the small yellow flower next to the word "in" in the title? The scrap of sticker paper had the corner cut out, but the flower was an easy fix! 


After I had the photo and title in place, I added the journaling. I got a bit creative with all of the different portions of my journaling since reflecting left me with so much to say. Finally it was time to embellish. I filled in many of the spaces with stickers from the Stickease sheet.


One of my traditional January layouts done. Keep your eyes open for the other - a layout about goals for the coming months.

What about you? Do you complete any pages at the end of one year or the start of another? How do you record goals or resolutions you set?

Friday, January 4, 2013

Don't be afraid to crop!

I posted this layout earlier this week:


and I confessed that I was nervous to try this pattern from the Make it From Your Heart book because of the five cropped photos. I am not skittish about cropping my photos, but I was nervous about this pattern for two reasons. First, the images looked small. I wasn't sure I would be able to crop my 4X6 photos and still keep enough of the image to tell a story. Second, this pattern doesn't allow for changing the sizes of the photos without some other changes that I didn't want to calculate.

I had many photos of my daughter opening gifts on this birthday so I decided to brave it. If it didn't work, I could always use other photos from the same day.

I am not a person who measures everything to a T. In fact, I often "measure" based on photo and paper sizes and mark mostly with my fingernails. Here is my non-scientific, minimal measuring way to crop photos to this size.


Here is my original 4X6 photo. My daughter opening the gift is the focal point, but there are may extraneous details in the image - especially on the right side.

To make this photo fit in the pattern I need to take off 2 inches from one dimension and 1 1/2 inches from the other.
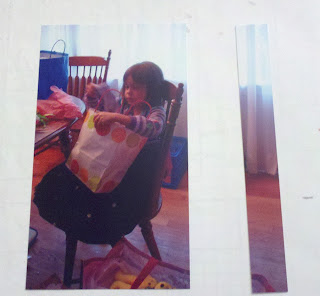
 When cropping to a specific size, I start with the side with the most "extra" space - in this photo the right hand side. I crop off whatever I think is the extra space without getting too close to my focal image. I can always come back and trim more closely later.


Here is my photo after my first cut. I have preserved the image of my daughter and she is now centered on the photo.
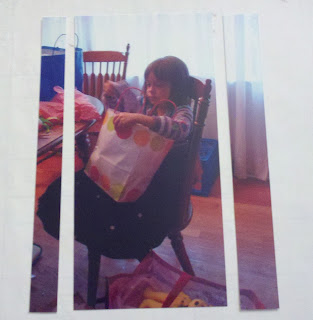


Next, I turned the photo in my trimmer and cropped off as much as I was willing to from the opposite side. Notice, so far there has been no measuring! I have been using the photo image as my guide.

After making these two cuts, I measured my photo and realized that I needed to trim a bit more so that it would fit the pattern. I decided I could take a bit more off of the right side of the photo more easily than the left. I measured the 2 1/2 inches and trimmed.


I followed the same process for the vertical dimensions of the photo. I started by trimming off the bottom with the chair legs and the bag. Then I measured and trimmed the photo to 4 inches.
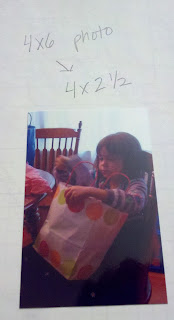


And here it is. The final cropped photo. The photo now fits in the pattern. Also, because I cropped it to this size, there is nothing to distract from the focal point - my daughter and her gift.
And here is the cropped photo in the layout.


Are you timid about cropping? Try it  - I think you may like the results! Do you have other tricks to make cropping easier? I would love to hear them - especially if they don't involve much measuring.

Monday, December 31, 2012

Paper Trail Blog Hop - Celebrating La Belle Vie!

Welcome to the paper trail blog hop. You probably arrived here from Vicki's blog. If this is your first stop, I hope you'll continue on with the hop.

I loved playing with this paper pack. I liked the classy colors that work well for my daughter and use pink without being babyish. To celebrate, I created two layouts about her birthday using patterns from the Make it From Your Heart book.


This pattern made me nervous at first because of the five small photos, but my friend Kerrie inspired me to use it. I am happy with the way it turned out. Cropping the photos smaller can help draw attention to certain elements and hide my sometimes flawed photos. (Check back Friday for some suggestions about cropping photos in this way.)


This paper seemed to call for bling and sparkle. I used the black sparkle flourishes some fussy cut flowers and Stardust Glitz.

I used a sentiment stamp intended for cards for the title and subtitle on this layout. Because I was able to include so many small photos to tell the story, my journaling could be very brief. I tucked the thoughts into the right hand flourish.

The second layout I created focuses on one gift my daughter received. This one also uses a pattern from the Make if From Your Heart book. I love using the patterns in this book because I can modify them to suit my layouts and style. Here I added two additional photos by using two 4X6 photos on the left page rather than a 5X7 and adding an additional photo cropped on the right page.


I used the same black sparkle flourishes (one pack was enough to create both layouts) and Startdust Glitz to embellish this layout. Once I find supplies that work well together I love to create multiple layouts using the same set. It saves me time making decisions!
For this layout I also used some word and definition stamps as embellishments. A variation on the rock and roll technique let me stamp the words in black and the definitions in grey so that the embellishment didn't overpower the layout.


 Thanks for stopping by! Remember to check Friday for some suggestions on cropping photos.

Your next stop is Karen's blog. I'm sure you'll love what she created.


Saturday, December 1, 2012

Paper Trail - Avonlea

Welcome to the Paper Trail! I hope you are enjoying the hop, whether you arrived here from Field's Finery or if this is your first stop.
 
It has been a busy week here. Who am I kidding? It has been a busy few months. Sometimes I feel as if I barely have time to take photos, much less scrapbook them. What do you do when you are short on time but long on inspiration? One of my favorite tricks is to turn to a favorite paper packet and coordinated embellishments and accessories. Using three sets of coordinated embellishments along with the Avonlea papers and a sketch brought this layout together in no time.


The  large chocolate cardstock doily shape cut from the Artiste Cricut Cartridge helped to customize the sketch to work with my papers. In addition to the Avonlea papers, I used three sets of coordinating embellishments on this layout: the Avonlea Complements Canvas Shapes, the Brocade Assortment and the Mini-Medley Accents Slate Collection. Choosing these already coordinated embellishments and having each of these collections on the table in front of me made it very easy for me to finish the layout.

When adding embellishments, I try to work with a visual triangle that draws attention to the title, journaling and photos. For the title on this layout, I included a canvas flower to which I added a slate button tied with twine. Between the layers of the title block I included a Resin Pin.
Tip for using pins on layouts: stick the pin into a foam square or a glue dot between layers of your page.


The second point on my triangle was the journaling. The journaling spot itself is a Canvas Shape. In addition, I added two items from the Brocade Assortment to fill in the gaps and tie the layers together. Adding an element like the medallion to a place where multiple layers meet (here the photo, two B&T papers, cardstock and the journaling spot) helps to bring a feeling of cohesion to the layout.


The third point on my triangle is on the right hand side of the page near my two favorite photos. Here I used a shape cut from the same cardstock as the title block to continue that color, a small Canvas Shape and another medallion from the Brocade Assortment. (Notice the way the embellishments overlap the layers again.)


I love the finished look these embellishments bring to this layout. The best part is that I still have many elements from each collection that I will be able to use on more projects in the future - especially since I seem to be constantly short on time! 


Thanks for stopping by! Please, continue hopping on to Mary's blog.

Wednesday, October 31, 2012

A Pear and Partridge Holiday Hop!

Welcome to the Paper Trail Blog Hop. This month we're getting into the holiday spirit with papers from the Pear and Partridge pack from Close to My Heart. If you've arrived here from Betsy's blog you're on the right track. (But don't worry, the hop is circular so you can start anywhere.)

Getting into the holiday spirit always gets me thinking about gifts. I've always loved giving handmade gifts. This year I created a couple of boxes that would make perfect gifts by themselves!


Both boxes are simple and inexpensive to create. For each one I used one sheet of B&T (patterned) paper and less than one sheet of cardstock. I embellished using the zip strips from the patterned paper, stamped images, dimensional adhesive and of course some sparkles.


This box is the perfect size for traditional sized note cards. Maybe the lucky recipient will get a few cards as well.


This box was designed to hold recipe cards or photos. Wouldn't it be a great place to store holiday recipes?


Thinking about the holidays also gets me thinking about lists - cookies to bake, cards to send, gifts to prepare, parties to attend. Maybe I'll keep the second box for myself. It could be a great place to store holiday records like which cookies, who received cards, who received which gifts. I may be on to something.

In that case, I may need to make another box. Luckily, they were easy to create, and I know where to get more supplies. Let me share one tip with you that made my life easier while I was creating. I planned the boxes carefully and then wrote directly on each surface what I planned to do. I knew the writing would be covered with paper in the final product, and these notes helped me keep my plan in mind no matter what interrupted me.


Thanks for stopping by. I hope you've been inspired by something you've seen, and I hope to see you back soon. Now, head on over to Amy's blog to see what holiday spirit she has in store for you! You might be surprised, but I think you'll like it!

Tuesday, October 2, 2012

Check it out!

I'm so excited! I'm one of the guest bloggers at writeclickscrapbook today!

I've been following this blog from the start. I discovered some of my favorite scrappers among the ladies there. I love to take the challenges that they set out. I am constantly inspired to try new things, take new photos, create new projects and look at things in new ways by the ladies in this group.

Today, I am a guest among them. I am so honored. I hope you'll stop over there to check it out. Once you're over there, take your time, look around. You may find some inspiration, too!